Wiring LEDs in Parallel: A How-To Guide
Wiring LEDs in parallel is the focus of this second part in our LED series. This method is often similar to wiring single LEDs. It simply involves connecting all your LEDs together. Then, you use a common positive (+) and negative (-) connection to power them. There are a couple of ways to wire LEDs in parallel. However, one way is not usually recommended. But there are times when it might be your only choice. Ideally, each LED should have its own resistor. This helps the LEDs get a more consistent current across the array when wired in parallel.
Why Choose Parallel LED Wiring?
There are several good reasons why you might choose to wire your LEDs in parallel:
- To begin with, you might want to keep things simple. You might not want to deal with different or more complex wiring setups. This is a very common reason.
- In addition, your power supply might not have enough voltage to power multiple LEDs in a series.
- Finally, it might be the quickest way to wire them for your specific project.
Key Notes for Wiring LEDs in Parallel
Before you start **wiring LEDs in parallel**, here are some important things to know:
- As you add more LEDs to your parallel setup, the voltage needs stay the same.
- However, as you add more LEDs, the current needs increase. For example, 5 LEDs that each use 20mA will need a total of 100mA (5 x 20mA).
- If you decide to use just one resistor for the whole array, all LEDs must be exactly the same. Do not mix colors or different types of LEDs.
Scenario 1: Each LED with its Own Resistor for Parallel Wiring
Let's look at a common example of **wiring LEDs in parallel**. We have a 5v power supply (1A) and we want to power five green 5mm LEDs. We check the specs for this LED and find it needs about 20mA at 3.0v. Since our power supply is only 5v, we cannot wire any of these LEDs in series. Consequently, our only choice is to wire them in parallel.
The voltage need for this setup is still 3.0v. However, our power supply must give at least 100mA (5 LEDs x 20mA each). Our 5v, 1A power supply is perfect for this. A common mistake is trying to match the power supply's maximum current to the LEDs' current. Our power supply will always give out 5v. But it only gives up to 1000mA if the LEDs need it. Since our LEDs will only need 100mA, this power supply works great.
Calculating Resistance for Scenario 1
The best setup for **parallel wiring** is to have one resistor for each LED. We calculate the resistor value the same way we would for a single LED. We did this in the "Single LED Wiring" part of this series. To make it easier, we will copy the steps here. We have adjusted the numbers for a 5v power supply.
Formulas for LED Resistor Selection:
- V=IR (Voltage = Current x Resistance)
- P=IV (Power = Current x Voltage)
Remember these units:
- Power is measured in Watts
- Current is measured in Amps or milliamps (mA)
- Resistance is measured in Ohms
To find the Resistance Value, we change the first formula to solve for R:
R = V / I
Now, let's solve for Resistance for one LED:
- R = (5v - 3v) / 0.020A
- R = 2v / 0.020A
- R = 100 Ohms
The voltage (V) in the formula is the voltage that is left over *after* the LED's needs. In our case, the power supply gives 5v. The LED needs 3.0v. So, 2v is left over. The LED uses 20mA, which is 0.020 Amps. The formula always uses Amps.
If we do the math, we get R = 100 Ohms. This is the resistance value, and it is very important. You should choose a resistor with a resistance value of 100 Ohms or higher.
Calculating Power Rating for Resistor (Scenario 1)
The next key part of choosing a resistor is its power rating. This rating tells you how much power (as heat) a resistor can safely handle. If there is a bigger voltage difference between the power supply and the LED's need, you will need a higher power resistor. Also, using higher power LEDs that need more current will change this greatly.
Use this formula to find the power (P):
P = I x V
For our resistor, the current (I) is the same as the LED (0.020A). The voltage drop (V) across the resistor is 2v.
- P = 0.020A x 2v
- P = 0.04 Watts
This power is less than 1/4 watt (0.25w). Therefore, a 1/4 watt resistor will work perfectly. Remember, using a resistor with a higher wattage rating is fine. It will not make your lights dimmer.
Choosing the Right Resistor (Scenario 1)
Now, let's pick the actual resistor for this **parallel LED wiring** setup. Look at a list of resistor values. You will see that 100 Ohm is an option. So, you can choose that exact resistor. If 100 Ohm was not an option, you would choose the next highest value.
Therefore, the best resistor for this setup is a 100 Ohm 1/4 watt resistor. This choice will help your LED array last a very long time.
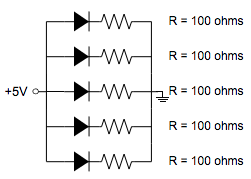
Wiring Diagram for Scenario 1
Now, let's look at how to actually wire them up with a resistor for each LED.
Scenario 2: Wiring LEDs with a Single Resistor for Parallel Wiring
This is the second way to **wire LEDs in parallel**. However, we typically do not recommend this method. We get asked about it often. You *can* use a single resistor for all your LEDs. But we suggest it only if it is your only choice. Sometimes, due to space, you can only wire LEDs in parallel, and you cannot use a resistor on each LED. In this situation, using one resistor may be your only option. This is still better than having no LEDs at all.
We will use the same setup: five green LEDs and a 5v power supply. This time, we will calculate for just ONE resistor. We use the same formulas and information as before. However, we change one key thing. We must treat all five LEDs as if they were a "single" LED for our calculations. You must use the exact same LEDs in this parallel circuit. If you don't, the current will not spread correctly across the LEDs, and it will cause problems. Therefore, for proper **wiring LEDs in parallel** using a single resistor, uniformity is key.
Calculating Resistance for Scenario 2
Here are the basic formulas again, which are key for **wiring LEDs in parallel**:
Formulas for LED Resistor Selection:
- V=IR (Voltage = Current x Resistance)
- P=IV (Power = Current x Voltage)
Remember these units:
- Power is measured in Watts
- Current is measured in Amps or milliamps (mA)
- Resistance is measured in Ohms
To find the Resistance Value, we change the first formula to solve for R:
R = V / I
Our LED information is for the entire parallel structure. We have 5 LEDs that each use 20mA at 3.0v. The forward voltage is still 3.0v because it does not change in a parallel setup. Each LED needs 20mA, and there are 5 LEDs. So, we add those up: 5 x 20mA = 100mA. We will now treat this as one 3.0v LED that uses 100mA.
Now, let's solve for Resistance:
- R = (5v - 3v) / 0.100A
- R = 2v / 0.100A
- R = 20 Ohms
Again, the voltage (V) is what is left over after the LEDs' needs. Our power supply gives 5v. The LEDs need 3.0v. This leaves 2v in excess. The LEDs use a total of 100mA, which is 0.100 Amps. The formula always uses Amps.
If we do the math, we get R = 20 Ohms. This is the resistance value, and it is very important. You should choose a resistor with a resistance value of 20 Ohms or higher.
Calculating Power Rating for Resistor (Scenario 2)
The next key part of choosing a resistor is its power rating. This rating tells you how much power (as heat) a resistor can safely handle. If there is a bigger voltage difference between the power supply and the LEDs' need, you will need a higher power resistor. Also, using higher power LEDs that need more current will change this greatly.
Use this formula to find the power (P):
P = I x V
For our resistor, the current (I) is the same as the total for the LEDs (0.100A). The voltage drop (V) across the resistor is 2v.
- P = 0.100A x 2v
- P = 0.2 Watts
This power is less than 1/4 watt (0.25w). Therefore, a 1/4 watt resistor *could* work. However, since 0.2w is close to 0.25w, we recommend moving up to a 1/2w resistor. Remember, using a resistor with a higher wattage rating is fine. It will not make your lights dimmer.
Choosing the Right Resistor (Scenario 2)
Looking at the 1/2 watt resistor page, we can see that the value closest to 20 Ohms without going under is a 22 Ohm 1/2 watt resistor. This would be the best resistor to choose for this setup for **parallel LED wiring**.
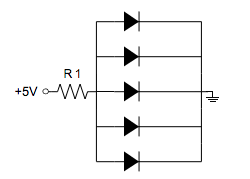
Wiring Diagram for Scenario 2
Here is how to wire them up in this configuration, using only one resistor for the entire parallel array:
Conclusion on Wiring LEDs in Parallel
In conclusion, mastering **wiring LEDs in parallel** offers flexibility for your projects, especially when voltage is limited. Whether you opt for a resistor per LED (the recommended method) or a single resistor (when space is tight), understanding the calculations ensures long-lasting and safe LED operation. By applying these steps, you can confidently power multiple LEDs in your designs.