
Xbox 360 ROL Board: Removal and Installation Guide
This guide shows you how to remove and install the Xbox 360 ROL board. The ROL (Ring of Light) board, which is also known as the RF board, is the small circuit board that controls the power button and the green indicator LEDs on the front of the original "Phat" Xbox 360 console. Swapping this board is a common step for many console mods. This tutorial will walk you through the process step-by-step.
Tools for the Xbox 360 ROL Board Mod
Before you can begin working, you need two things. First, you must have already opened your console's case. Second, you will need a specific tool to remove the internal screws.
- A guide on how to open the original Xbox 360 (Phat) console.
- A Security Torx T8 screwdriver.
How to Remove the Xbox 360 ROL Board
Removing the board is a straightforward process once you have access to the inside of the console. Follow these simple steps.
Step 1: Remove the Plastic Cover
First, you need to remove the white plastic cover from the ROL board (or RF board). This cover protects the board's components. It should come off easily with a little prying, revealing the circuit board and screws underneath.
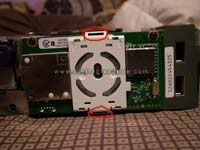
Step 2: Unscrew the Board
Next, you will see three small screws holding the board in place. Use your T8 Torx screwdriver to remove these three screws. Be sure to put them in a safe place so you do not lose them.

Step 3: Unplug and Remove the Board
Finally, you can pull the board out. It is plugged into the console's motherboard at the lower left. You may need to gently wiggle it to disconnect it from the plug. Once it is unplugged, you can fully remove the circuit board from the console.

Installing a New Xbox 360 ROL Board
After you have removed the old board, you are ready to install your new one. This is especially useful if you are installing a pre-modified board with custom colored LEDs.
To install the new board, you simply reverse the process. First, carefully align the new board with the plug on the motherboard and press it firmly into place. Then, secure it using the three T8 screws you removed earlier. Finally, snap the plastic cover back on. After that, you can put your console's case back together. With everything reassembled, you can power on your Xbox and marvel at the new addition to your custom console.
Conclusion on the Xbox 360 ROL Board
In conclusion, removing and installing the **Xbox 360 ROL board** is a simple task that opens up many modding possibilities. By following these steps, you can easily swap out the board for repairs or to add custom LEDs. This is a great starting point for anyone looking to personalize their original Xbox 360 console.