Select the color bands on your resistor to instantly calculate its resistance value, tolerance, and find matching products in our store.
Resistor Color Band Calculator
Select the color bands on your resistor to instantly calculate its resistance value. Works with both 4-band and 3-band resistors. Click each color below to update the resistor diagram and see the calculated value, tolerance range, and matching products from our catalog.
Resistor Color Code Chart: How to Read Resistor Values
This guide explains how to use a resistor color code chart. Resistors are fundamental components in electronics, and knowing how to read their values is essential for any project. This chart helps you quickly determine the resistance, tolerance, and sometimes the temperature coefficient of a resistor. We will break down the key values to consider and provide a clear example.
Understanding Resistor Values and the Color Code Chart
When working with resistors, especially for basic modifications like LED circuits, three main values are important:
1. Power Rating (Watts)
The power rating tells you how much power a resistor can safely handle before it overheats and burns out. You can usually tell this by the physical size of the resistor itself. Generally, for the types of resistors we offer, a larger resistor can handle more power. This means it can be used with applications that draw more current, like powering multiple LEDs.
2. Resistance (Ohms)
Resistance is the most crucial value. It tells you how much the resistor restricts the flow of electrical current. The unit for resistance is Ohms (Ω). A lower Ohm value means more current can pass through. Conversely, a higher Ohm value means less current is allowed to pass. The color bands on the resistor help you determine this value quickly.
3. Tolerance
Tolerance indicates how close the resistor's actual resistance is to its stated value. It is expressed as a percentage. For example, a 100 Ohm resistor with 1% tolerance is guaranteed to have a resistance between 99 and 101 Ohms. In contrast, a 5% tolerance resistor would be between 95 and 105 Ohms. For most basic lighting mods, tolerance is not extremely critical. However, for very precise calculations or maximizing LED brightness, a tighter tolerance (like our 1% resistors) is beneficial.
Here are the types of resistors we offer for various projects:
1/4-1 Watt Metal Film Axial Lead Resistors
Using a Resistor Color Code Chart
The core of this guide is learning how to read resistor values. Resistors have colored bands that represent their values. You read these bands in a specific order, typically from left to right. The brown or gold bands usually indicate tolerance and are placed on the right side of the resistor.
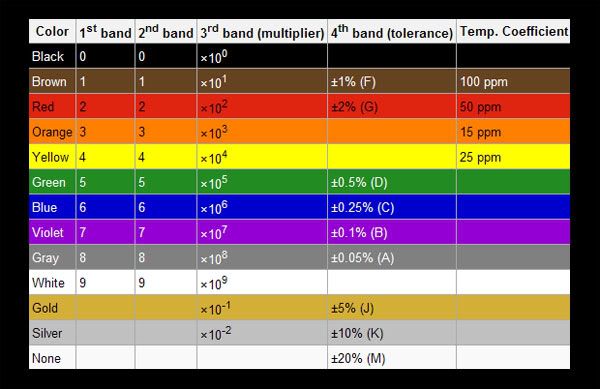
How to Read Your Resistor Color Code Chart
Let's use an example to illustrate how to read a resistor's value. Imagine you have a resistor with the following color bands, read from left to right:
- **First Band:** Orange
- **Second Band:** White
- **Third Band:** Orange (Multiplier)
- **Fourth Band:** Brown (Tolerance)
Now, let's break down each band according to the chart:
- **First Digit (Orange):** From the chart, Orange represents the number 3.
- **Second Digit (White):** From the chart, White represents the number 9.
- **Multiplier (Orange):** From the chart, Orange represents a multiplier of 10^3 (which is 1,000).
- **Tolerance (Brown):** From the chart, Brown represents a tolerance of (+-)1%.
To calculate the resistance value, combine the first two digits and then multiply by the multiplier:
- Your first digit is: 3
- Your second digit is: 9
- The multiplier is: x10^3 (which means add three zeros)
- The tolerance is: (+-)1%
So, your resistor value will be 39 x 10^3 Ohms, which equals 39,000 Ohms. You will often see this value written as: 39k Ohm 1%.
Note: If your multiplier band is black, it means x10^0 = 1. Therefore, you will not add any zeros to your resistance value.
Conclusion on Using the Resistor Color Code Chart
In conclusion, understanding how to use a resistor color code chart is a basic but vital skill for anyone working with electronics. By knowing how to read the bands, you can quickly identify a resistor's resistance, power rating, and tolerance. This ensures you always use the correct components in your circuits, leading to successful and safe projects.