PS3 Controller LED Mod: Player Indicator Swap
This guide explains how to perform a PS3 controller LED mod. This modification allows you to change the color of the red player indicator lights on your PlayStation 3 controller. We will cover the tools you need, how to open the controller, and how to swap the tiny SMD LEDs for custom colors.
Required Tools and Parts
Before you begin your **PS3 controller LED mod**, you will need a few common tools:
- A small Phillips head screwdriver
- A soldering iron and solder
- Tweezers for handling small parts
- New 0603 SMDs in the color of your choice
Step 1: Opening the PS3 Controller
First, you must open the PS3 controller. This is a very simple task. Look at the controller from the backside and find the screws. You need to use a small Phillips screwdriver to remove all of the visible screws. Luckily, there are no hidden ones that you should be worried about.
Once you remove the screws, simply place the controller with the buttons facing down. Then, you can remove the bottom part of the shell. We do it this way so the buttons don't fall out everywhere when you take it apart.
Step 2: Removing the Original LEDs (SMDs)
Next, you need to remove the existing surface mount devices (SMDs) from the board. We are going to use a method that we like to call 'floating' the SMD off.
This method involves putting a good amount of solder on the tip of your iron. Then, you drag it across the edge of the SMD where the two solder points are. Your goal is to melt both connections at the same time; otherwise, the SMD will not 'float off' cleanly. Do not apply excessive pressure to the SMD with the iron. For instance, a tiny bit is acceptable, but not a lot. Too much pressure risks tearing up a solder pad on the board. Sometimes, adding a little bit of solder to each end of the SMD before trying to 'float' it off can help a lot. After you remove all four lights, make sure the soldering pads are clear of excessive solder. You don't want mounds of solder on the pad, as this will cause trouble when soldering the new LEDs on flat.
Step 3: Installing New LEDs for Your PS3 Controller Mod
After you remove all the original lights, you must then put on the new ones. The image below shows the circuit board you will be working on.
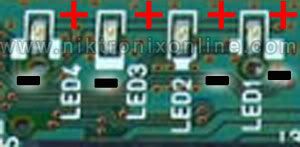
First, get out your new SMDs. You should remove only one at a time from its packaging. If you take them all out at once, you will most likely lose one because they are very small. When you have one removed, pick it up with the tweezers and look to see which side is positive (anode) and which is negative (cathode).
Now that you know the orientation of the SMD, position it for installation. It should be lying flat with the lens facing directly up. We are going to solder the positive side first. Therefore, add a little solder to the positive (+) pad on the board where you are going to solder to first. Next, grab the negative side of the SMD with tweezers and hold the positive side of the SMD just above the correct pad. Once you have it in the position you want, hold it tightly. Then, melt the solder that you just added to the pad and put the SMD into the solder so it sticks. You should then remove the soldering iron and let the solder cool down and harden. Finally, you can remove the tweezers. It is important to remember that you should not apply heat to the board or the SMDs for very long, as you could cause damage. You should only apply heat for a couple of seconds at a time at the most. Repeat this process for all of the lights and you are done!
Conclusion
In conclusion, completing a **PS3 controller LED mod** is a great project for customizing your gear. Once you have reassembled the controller, you can test it out and enjoy the new look. This modification is a simple but effective way to personalize your gaming experience.